For most small businesses, your monthly Xero subscription is a deliberate investment into your business. There are other accounting software packages out there that will provide you with a similar result, but you want to know that your numbers are in safe hands. It might be Xero’s slick user interface and therefore high usability that appeals to you, making it easy for you to keep on top of your numbers, or it might be that you love the idea of supporting a local NZ tech business (woohoo, go NZ!). Whatever your motivation is for using Xero, you want to know that you’re getting the most out of that monthly fee which leaves your bank account. With helping you achieve this in mind, today I’m sharing three tips which will help you get the most out of your monthly Xero subscription.
1. Uploading receipts via the app while you’re on the go
If you’re using Xero, you need to be using the Xero app (available from Google Play and iTunes). The app has a tonne of great features, including the ability to send invoices on the go, however, today my first tip to help you get the most out of your subscription is uploading your receipts using the app.
Most receipts these days are printed on thermal paper and as I’m sure you’re aware they fade… fast! Traditionally, small business owners have had to photocopy the original receipt to ensure they have a copy in the event they need to make a warranty claim or the IRD comes knocking. This made trees sad! More recently, technology has caught up, and we’ve been able to either scan or take a photo of a receipt and save this on a flash drive or in the cloud. Trees were happy about this, but it still required a fair bit of work to ensure you were naming your files well in case you ever needed to find one. Xero has provided the ultimate solution to this problem and made it super simple to boot.
So how do you do it? To add a receipt to an existing transaction, download the app and log in to your account. Select ‘receipts’ (at the bottom of the screen) and find the transaction you have previously coded in Xero by scrolling through the ‘Done’ section and select it. In this example, I’m adding a receipt to ‘Berry Blue’.
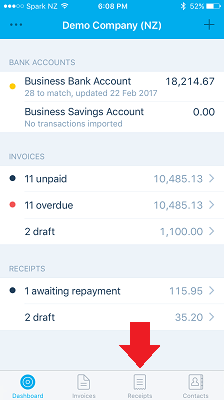
Select ‘receipts’

Find the transaction you have previously coded in Xero by scrolling through the ‘done’ section and select it
You now see all information relating to that transaction.
Select ‘Attach files’ – you will be presented with three options: take photo, choose photo or choose from Xero files. Take photo will use your phone camera to take a photo of the receipt, choose photo will let you choose a photo from your phone gallery, and choose from Xero files will let you choose a previously uploaded file to attach.
My favourite option is ‘take photo’ as it doesn’t save a copy to my phone gallery and I don’t end up with a whole heap of random photo receipts hogging my phone space that I need to clear out. From there, take photo is as simple as point and click with your phone camera, then confirm you’re happy with the quality of the photo and select either ‘retake’ or ‘use photo’. The image is immediately attached to that transaction. Easy peasy!
Take photo will use your phone camera to take a photo of the receipt, choose photo will let you choose a photo from your phone gallery, and choose from Xero files will let you choose a previously uploaded file to attach. My favourite option is ‘take photo’ as it doesn’t save a copy to my phone gallery and I don’t end up with a whole heap of random photo receipts hogging my phone space that I need to clear out. From there, take photo is as simple as point and click with your phone camera, then confirm you’re happy with the quality of the photo and select either ‘retake’ or ‘use photo’. The image is immediately attached to that transaction. Easy peasy! 🙂
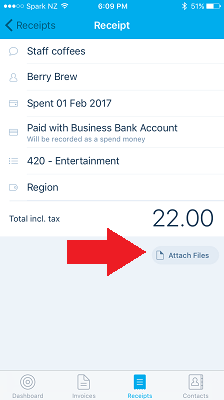
Select ‘attach files’ to take a photo of your receipt.
If you want to upload a receipt before you’ve created the transaction in Xero, you can even create the transaction while you’re uploading the receipt by selecting the + in the top right-hand corner of the receipts page. The transaction will then sit in Xero ready for you to allocate when completing your bank reconciliation – so no doubling up on inputting.

Create a new receipt transaction
2. Set up repeating invoices
One of Xero’s best features for any business that invoices a regular fixed amount is repeating invoices. This feature is a personal favourite of mine which I’ve previously alluded to in my Top 10 online tools for small business blog.
As a service provider, many of my clients come on board on service packages, so for the standard service that I provide them, I charge a fixed monthly fee. When invoicing multiple clients, it could be easy at the end of each month to accidentally ‘forget’ to invoice a client – I’m sure they wouldn’t mind, but it really wouldn’t really be the best business move!
To set a repeating invoice up, log into Xero on your browser, select ‘Accounts’ > ‘Sales’ > ‘+New’ > Repeating Invoice. The next screen is fairly similar to the standard Xero invoicing screen that you’re used to, except there are some additional options at the top.

Select ‘repeating invoice’ on the sales screen
All fields on this screen are mandatory, except end date and reference. You can select how often to repeat the transaction, when the first invoice should be raised, and what the due date should be. Also, if the repeating invoice is only required for a fixed amount of time (for example, a client has signed on for a six-month term), you can enter an end date, so Xero doesn’t accidentally invoice more than it should. Additionally, you need to select what Xero should do with the invoice once it is generated – save as draft, approve or approve for sending.
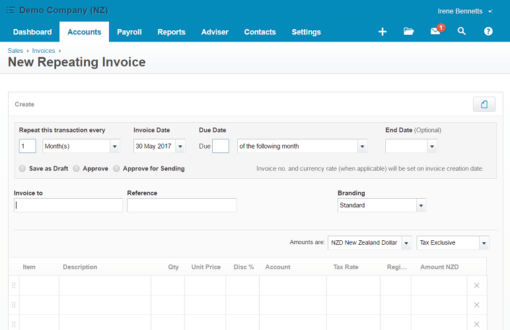
Xero Repeating Invoice setup screen
Save as Draft:
Will generate the invoice in draft format for your review – this is useful if you’d like to check the invoice first.
In my previous life, we used repeating invoices for a Software as a Service product that was invoiced annually, per unit. We set the repeating invoices up to generate as draft but always needed to review them before sending in case the customer had added additional units throughout the year, as was quite often the case.
Approve:
Will automatically approve the invoice in Xero, so it shows as awaiting payment. However, you will still need to ensure your client gets a copy.
Approve for sending:
Will approve the invoice and automatically send it to the email address(es) loaded for the client. If you know there aren’t going to be any variances, this is the most time-efficient option for you to use.
The rest of the invoice is entered as you would normally enter an invoice in Xero and then all you need to do is ‘save’, and you’re done!
3. Set up bank rules
Until recently, I thought this was something all Xero users knew. However, I’ve recently on-boarded a couple of new clients who have no bank rules set up and everyone needs to know this as it’s one of the greatest time-savers in Xero.
Bank rules provide you with a simple way to reconcile regular bank transactions that don’t have bills set up for. For example, every fortnight I attend a breakfast networking meeting at a local Café, and I pay $17 for my breakfast (and get up way too early, but that’s another story!). When I code this transaction, it’s always split 50% ‘Entertainment’ and 50% ‘Entertainment – Non-deductible’, as per Inland Revenue guidelines. Without a bank rule in place, when reconciling the transaction, I must manually enter the split.
Side note: Xero will save the details of how you have previously coded a similar transaction and suggest that the next time, but this isn’t as efficient in split transactions such as those involving entertainment, so this isn’t necessarily the greatest time-saver out there.
To set up a bank rule select ‘reconcile’ on your bank account. Then on the transaction you’d like to set up the bank rule for, select ‘create rule’.

You then want to work your way through the ‘Create Rule’ screen and ‘save’. Xero has a great explanation of bank rule conditions and how they work.

Work your way through the ‘Create Rule’ screen and ‘save’
All transactions affected by this rule will now magically have the rule applied, meaning all you have to do have confidence in your rules and select ‘OK’ during reconciliation.